Setup FastestVPN with L2TP Protocol on TP-Link Router
This tutorial explains how to connect your TP-Link Router to FastestVPN using L2TP.
Go to web browser and access your router’s Web Configuration Panel by entering its IP address in the search bar. Usually the default IP to access the router is 192.168.1.1 or 192.168.0.1
It will ask for your router’s Username and Password. By default the router’s username is admin and password is also admin. Enter this information and click on “Login”. You may also find the router’s login information in router’s user manual.
Here is how to connect a TP-Link router to FastestVPN using L2TP protocol:
Step #1: Click on “Network” and then select “WAN. (If these options do not appear, then go to “Internet” and click on “Basic”)
Enter following information:
- WAN Connection Type: L2TP/Russia L2TP
- Enter your FastestVPN “Username” and “Password”.
- Dynamic IP: Enable
- Service IP Address/Name: Enter your desired L2TP server address. As In this case Netherlands server address nl-sk-l2tp-01.jumptoserver.com is entered. Please click here to visit FastestVPN Complete L2TP server list
- WAN Connection Mode: Choose either you would like to reconnect manually, on demand or always.
- Click on “Save” button and then click on “Connect”
Soon the connection status will appear as “Connected!”

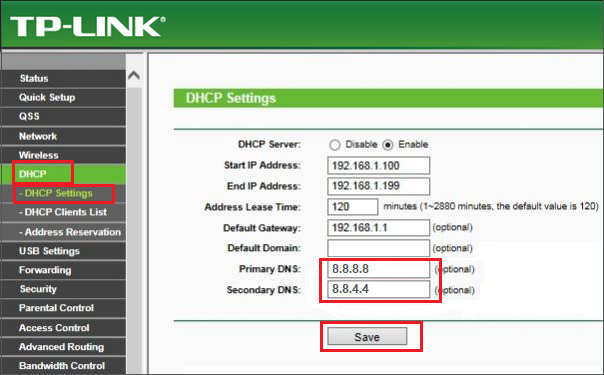
It is also recommended to add DNS in router settings. For this, go to DHCP > DHCP Settings and add 8.8.8.8 and 8.8.4.4 in Primary DNS and Secondary DNS respectively. After that, click on “Save“.
You are done!!
Enjoy Complete Online Freedom with FastestVPN Speed
