Setup FastestVPN on PS3/PS4/PS5
Leverage enhanced privacy protection on your favourite Sony PlayStation. Setup FastestVPN on PS3/PS4/PS5 and enjoy a seamless gaming experience! Keep reading to find out our brief tutorials about installing and using the VPN on your PS.
2 Methods to Setup FastestVPN on PS3/PS4/PS5
There are two methods to set up a VPN on your PS3, PS4, or PS5 device.
- Method 1: Setup FastestVPN on a VPN-supported WiFi router
- Method 2: Setup FastestVPN on a computer and share the connection with the PS3/ PS4/PS5.
Method 1: Setup FastestVPN on PS3, PS4 or PS5 Using a WiFi Router
Note: You must set up the FastestVPN on a VPN-supported WiFi router. FastestVPN supports various kinds of routers. To find the setup guidelines, please visit our Router VPN Tutorials Page.
We recommend jumping to the next method if you don’t see your VPN router listed on the page. Meanwhile, you can email us at support@fastestvpn.com with screenshots of your router’s model name and the VPN settings from its web setup page.
Once you’ve set up the VPN on the Router, switch on your PS3/PS4/PS5, which is already connected to the WiFi. Ensure the PlayStation and router are connected to the same WiFi network. Following that, here’s a brief tutorial on how to setup the VPN on PS3/PS4/PS5:
- In the XMB Menu of PS3/PS4/PS5, go to Settings.
- Click the Network Settings tab and select Set Up Internet Connection.
- Select Use Wi-Fi.
- Select the connection method as “Easy.” Your PS3/ PS4/PS5 will now scan your wireless connection.
- Click on your Wi-Fi connection and enter the password.
- When asked, click on Do Not Use a Proxy Server.
- Finally, accept all settings with a careful review and continue for a “Test Connection.”
You’ll be connected to the Wi-Fi network that has already been configured with FastestVPN.
Method 2: Setup FastestVPN on PS3/PS4/PS5 Through the VPN Sharing
The sharing method varies for Windows and Mac. The following tutorials are divided according to the devices:
Sharing FastestVPN Through Windows
Note: Ensure the FastestVPN app is installed and running on your Windows PC.
Here’s how you can share FastestVPN on PS3, PS4, and PS5 via a Windows device:
- Connect PS3/ PS4 to your PC using an ethernet crossover cable.
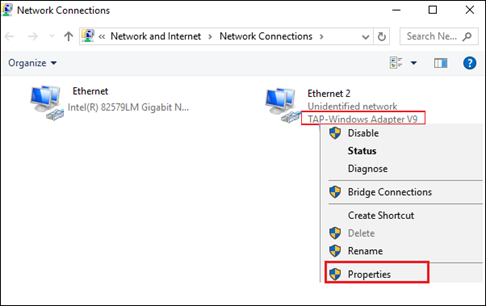
- On your Windows, open the “Network Connections“. You can open it by entering NCPA.CPL on Windows search.
- Locate the adapter “TAP-Windows Adapter V9” and open its “Properties.”
- On the properties windows, navigate to the “Sharing” tab and put a checkmark on “Allow other network users to connect through this computer’s Internet connection.”
- In the “Home networking connection drop-down menu,” select the connection you want to share with the console. Then, click on OK.
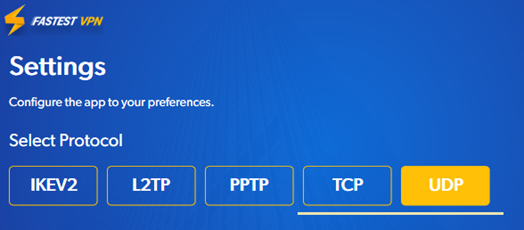
- Now open the FastestVPN App and click the “Settings” gear icon. Select either TCP or UDP.
- Connect the VPN to your desired server location.
- Now, in PS3, access the XMB menu, or if you have a PS4, access the Dynamic Menu. Then go to “Settings” and open “Network Settings,” and then select “Set up Internet Connection.”
- When prompted, select Use a LAN Cable and the connection method.
- Click on Do Not Use a Proxy Server.
- Now, accept all settings with a careful review and continue for a “Test Connection.”
Sharing FastestVPN Through Mac
Note: Ensure the FastestVPN app is installed and running on your Windows PC.
- Use an ethernet crossover cable to connect your console’s ethernet port directly to your PC’s ethernet port.
- Press the Windows key + Search for “NCPA.CPL” or “Network Connections.“
- Locate “TAP-Windows Adapter V9” in the list.
- Right-click “TAP-Windows Adapter V9” and select “Properties.“
- In the adapter properties, go to the “Sharing” tab.”
- Check “Allow other network users to connect through this computer’s Internet connection.”
- From the “Home networking connection” dropdown, select the internet connection (Wi-Fi or ethernet) you want to share.
- Click “OK” to save.
- Open the FastestVPN app and choose your preferred protocol (TCP/UDP) in Settings.
- Connect to your desired server location.
- Access the console’s main menu (XMB for PS3, Dynamic Menu for PS4/PS5).
- Navigate to “Settings” > “Network” > “Set Up Internet Connection.”
- Select “Use a LAN Cable” for the connection method.
- Choose “Easy” on the next screen.
Note: Ensure “Do Not Use a Proxy Server” is selected.
- Review all settings on your console.
Click “Test Connection” to verify internet access through the shared VPN connection.
