Fix DNS Leaks on Linux
Through the Network Manager
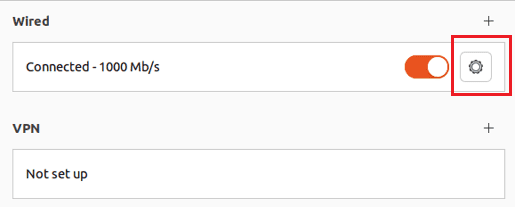
Step #1: Open your network settings and then click on the settings icon next to the connected Wired/ Wi-fi connection name.
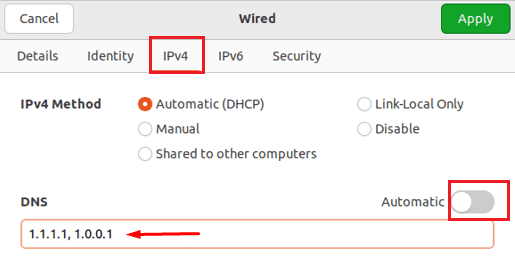
Step #2: Click IPv4 and disable the “Automatic” toggle switch next to “DNS”.
Enter your desired DNS addresses separated by a comma such as 1.1.1.1,1.0.0.1 and click on Apply.
While using a VPN, it is also recommended to turn off the IPv6. To do this, click on “IPv6” next to the IPv4 tab. Then set its status to “Disable” and apply the settings.
Some popular DNS addresses are:
Google: 8.8.8.8 and 8.8.4.4
Cloudflare: 1.1.1.1 and 1.0.0.1
OpenDNS: 208.67.222.222 and 208.67.220.220
Comodo: 8.26.56.26 and 8.20.247.20
Note: Using the Google DNS is not recommended in the VPN-restricted regions.
Through the Command Line
Step #1: Switch to the superuser and run these commands.
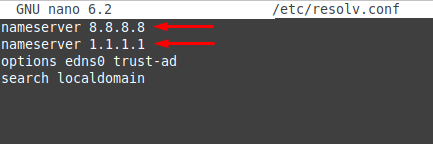
nano /etc/resolv.conf
Step #2: Modify the name servers. For example:
nameserver 8.8.8.8
nameserver 1.1.1.1
Save and close the file by pressing Ctrl+X and then Y.
Fix DNS Leaks While Using OpenVPN
Open your OpenVPN Config file (.ovpn file) and add the following lines at the bottom and save it.
script-security 2
up /etc/openvpn/update-resolv-conf
down /etc/openvpn/update-resolv-conf
This script will make OpenVPN use only the default DNS from your .ovpn file.
Make a new connection to the OpenVPN.
Note: If OpenVPN fails to connect with the error log “options error: –up script fails with ‘/etc/openvpn/update-resolv-conf’: No such file or directory”, then install the update-resolv.conf script by running:
sudo wget -O /etc/openvpn/update-resolv-conf https://raw.githubusercontent.com/masterkorp/openvpn-update-resolv-conf/master/update-resolv-conf.sh
Then run:
sudo chmod +x /etc/openvpn/update-resolv-conf
Now connect to the OpenVPN again.
