How to Set up FastestVPN on TP-Link Router
This tutorial explains how you can set up the FastestVPN on a TP-Link Router with the PPTP and L2TP
protocols. Follow these steps to set up the TP-Link Router VPN.
Steps to set up the VPN
On a browser address bar, access the router’s web setup page by typing in 192.168.1.1. Sign in with your router’s login username and password. By default, both of them are admin. If it doesn’t work, check your router’s manual to find out its default gateway address.
Now set up the PPTP or L2TP VPN on your TP-Link router. We have created the tutprials for two different user interfaces.
-Setup VPN on TP-Link With PPTP or L2TP: Interface 1:
-Setup VPN on TP-Link With PPTP or L2TP: Interface 2:
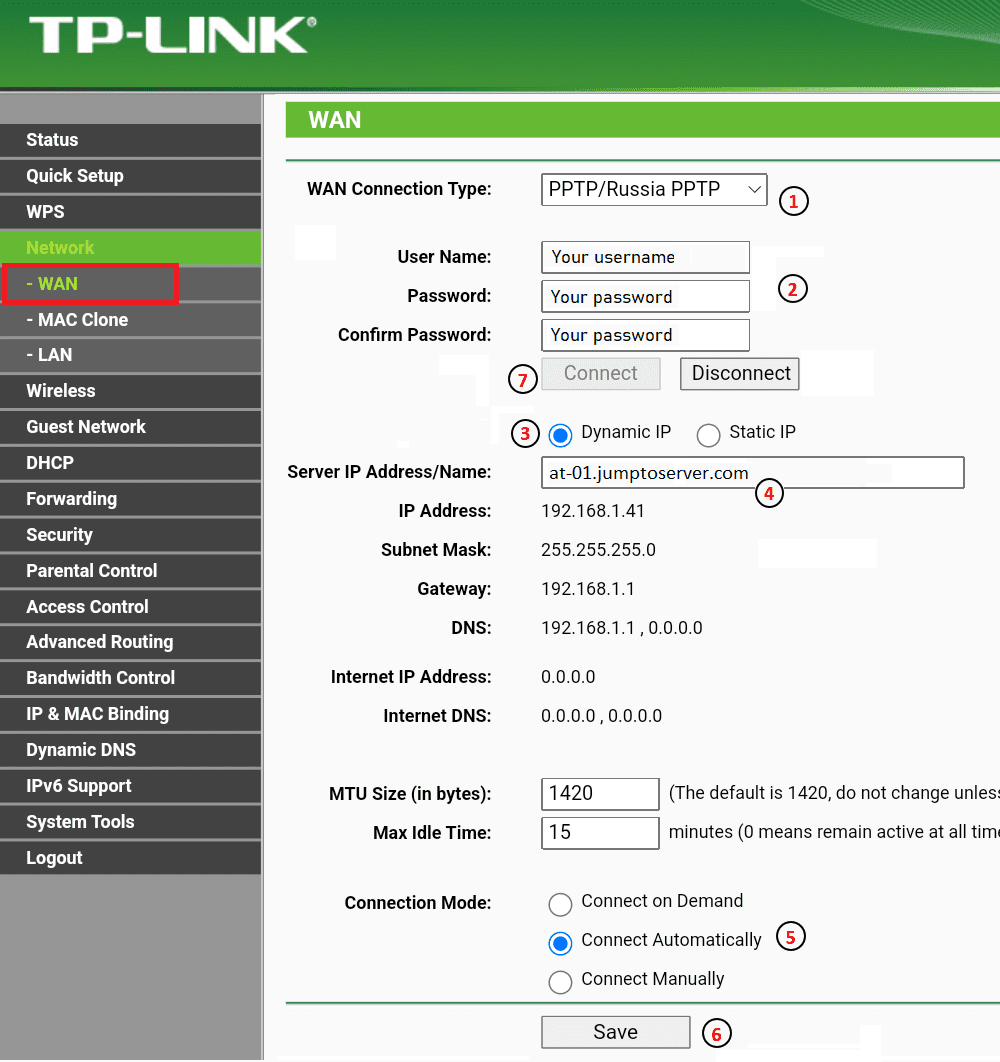
Setup VPN on TP-Link With PPTP or L2TP: Interface 1:
1. Click on Network and then select WAN.
2. Enter the following information:
- WAN Connection Type: PPTP/Russia PPTP (Or choose “L2TP” in case you want to connect to the L2TP protocol.
- Enter your FastestVPN Username and Password in the relevant fields
- Dynamic IP: Enabled
- Service IP Address/Name: Enter your desired FastestVPN server address. As In this case Austria server address at-01.jumptoserver.com. Click here to visit the complete server list.
- Connection Mode: Choose if you would like to connect on demand, automatically or manually.
- Click the Save button and then click on Connect.
- Soon, the connection status would appear as Connected!
Adding the DNS Servers
It is also recommended to add DNS servers on your router settings. For this, go to Network > WAN. (Or go to DHCP > DHCP Settings ). Check mark Use These DNS Servers.. Then add FastestVPN’s DNS addresses 10.8.8.8 and 10.9.9.9 in the Primary DNS and Secondary DNS respectively. Then click Save and reconnect the VPN.
If these settings do not work, then add another DNS address such as 8.8.8.8 and 1.1.1.1 respectively.
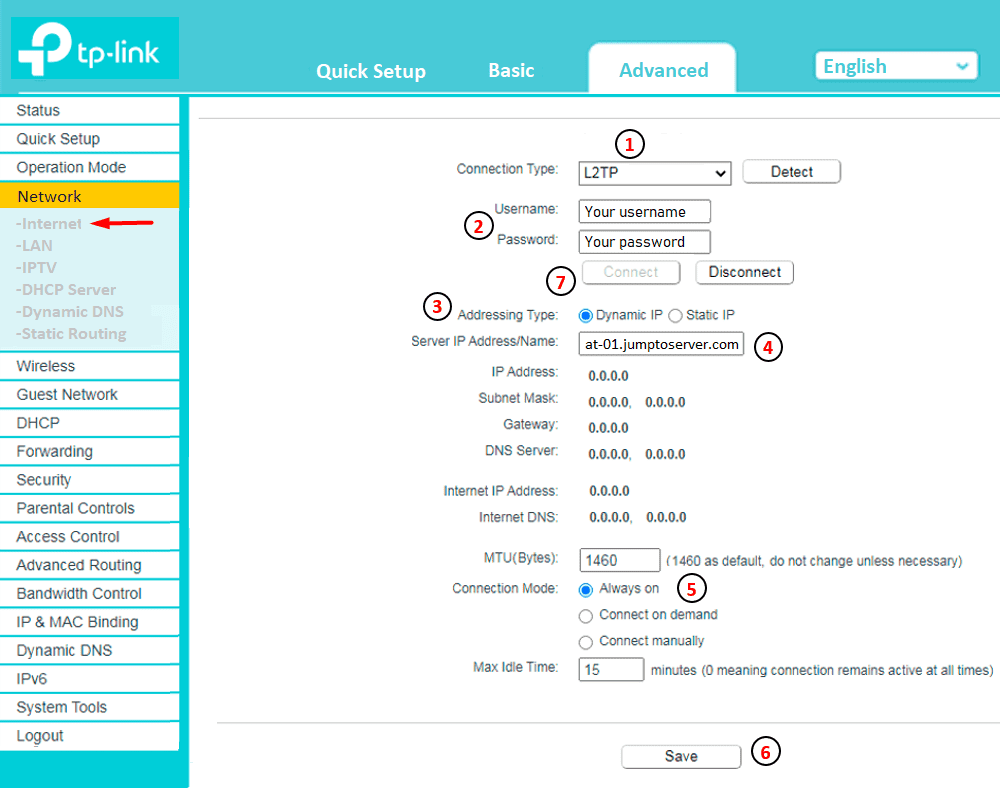
Setup VPN on TP-Link With PPTP or L2TP: Interface 2:
1. Click on the “Advanced” tab. then click on Network Internet. (If these settings do not appear, then click Network > WAN).
2. Enter the following information:
- WAN Connection Type: A protocol of your choice, PPTP or L2TP
- Enter your FastestVPN Username and Password in the relevant fields
- Dynamic IP: Enabled
- Service IP Address/Name: Enter your desired FastestVPN server address. As In this case Austria server address at-01.jumptoserver.com. Click here to visit the complete server list.
- Connection Mode: Choose if your VPN should be always on, connect on demand, or connect manually.
- Click the Save button and then click on Connect.
- Soon, the connection status would appear as Connected!
Adding the DNS Servers
It is also recommended to add DNS servers on your router settings. For this, go to Network > Internet > Advanced. (Or go to Network > DHCP Server). Check mark Use the following DNS Addresses. Then add FastestVPN’s DNS addresses 10.8.8.8 and 10.9.9.9 in the Primary DNS and Secondary DNS respectively. Then click Save and reconnect the VPN.
If these settings do not work, then add another DNS address such as 8.8.8.8 and 1.1.1.1 respectively.


